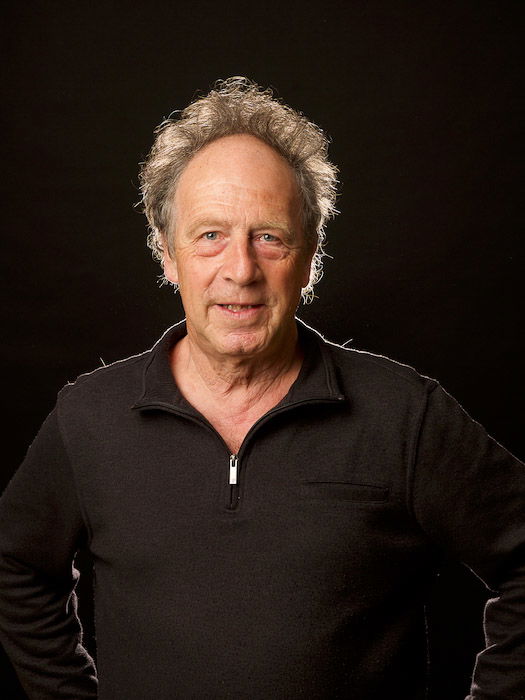
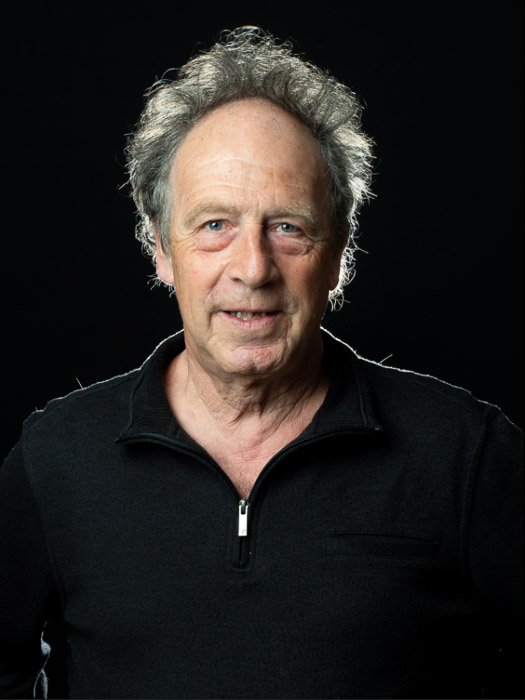
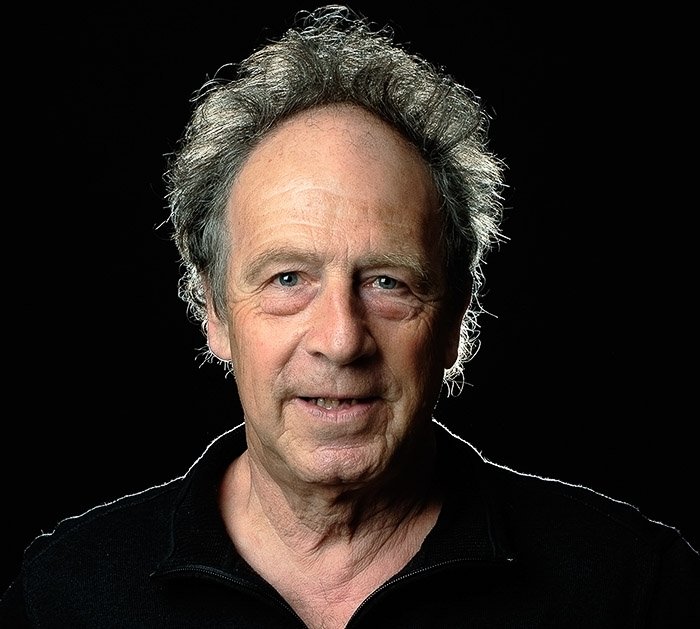
Photoshop Portrait: The Portrait
I chose this portrait because it is almost there straight from the camera. The key to enhancing this portrait is in the details. This is often the most difficult thing to get right when it comes to Photoshop.
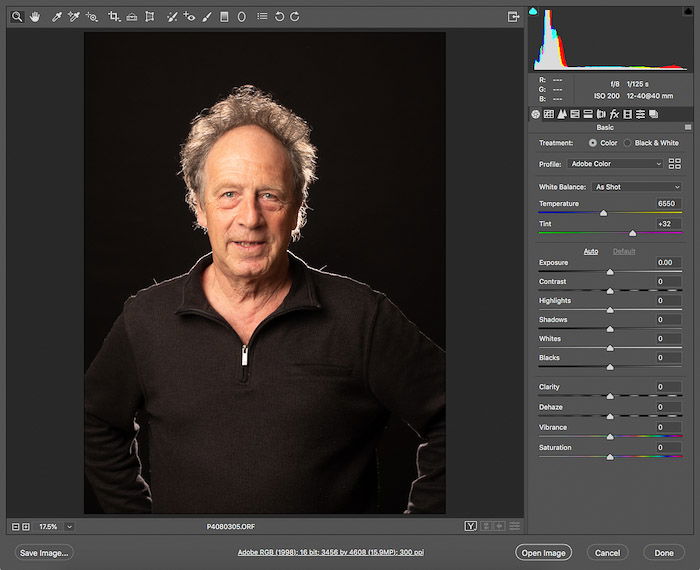
Starting Out in ACR
When you open a RAW file with Photoshop, Adobe Camera RAW (ACR) opens in a new window. This is an automatic process you can’t avoid. Your Photoshop retouching will start with ACR when working on raw images.
The ACR Interface
The ACR interface has 3 main parts. It has a tool bar, an editing settings section and an image control section. This is where you can export, save your editing and open your image in Photoshop.
Before You Begin
Before starting the editing, it is best to look at your image and try to remember how you shot it. What was the lighting scheme and why did you chose it? What is the final use of the image and what aspects do you want to emphasise? When I took this portrait, I was using a classic two light setup. I was showing the role of separation light. To do this, I used rim light as the separation light. This works particularly well in this image, thanks to the subject’s hairdo. You may also note that this is a classic low key setup, so shadows and black should be rather deep. Finally, as in all portraits, the eyes need to pop but not look fake. This way that the viewer can engage with the model.
How to Achieve Natural Skin Tones
The basic editing I start out with is correcting or setting the dynamic range of the image. This includes the blacks and highlights. I also adjust the white balance to ensure my subject’s skin color is natural. Usually the skin is going to be a bit too orange in the image straight from the camera. This happens even if you used the flash setting for the white balance.
Setting the White Balance
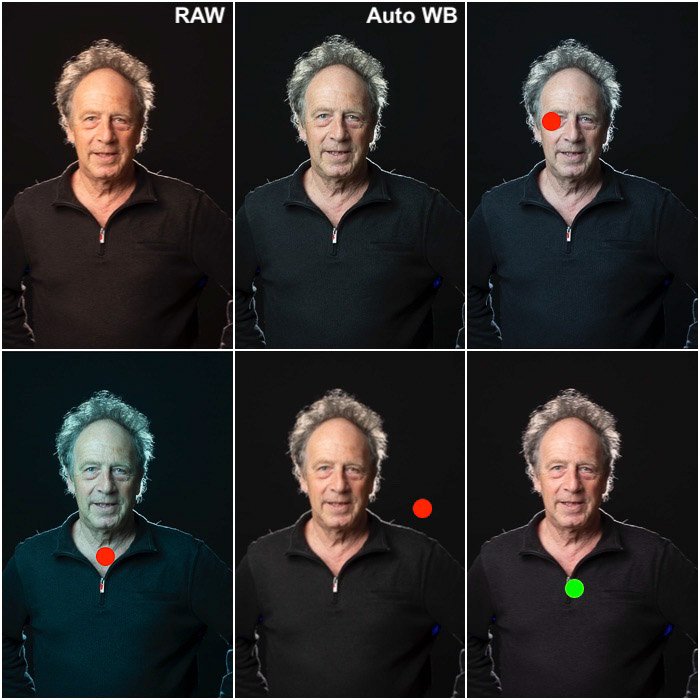
I like to start with fixing the white balance. Straight from the camera, the image looks a bit too warm to me. I prefer to have less orange in the skin tone. To fix the white balance you can use the eyedropper tool. Sample areas that you know should be white-ish, grey or black. The image below shows you various edits. The first is the RAW image, followed by the one with Auto white balance applied. The rest are versions where I sampled various areas. These are marked with the red dot. I found that sampling the zipper (last image) gave me the most natural looking skin tone. So I kept that white balance and moved on with the editing.
Look For Clipped Areas
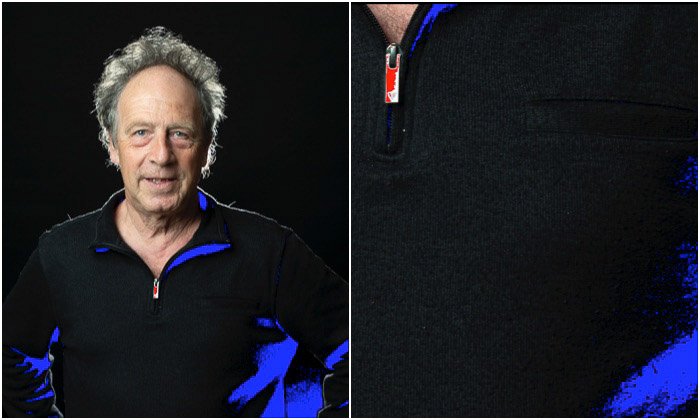
In ACR, above the histogram, there are two small icons, at each side of the histogram. Those toggle on/off the warnings for clipped highlights and blacks. Toggle them on and look if areas in your image are now colored in blue (black warning) or red (highlight warning). Sometimes you’ll have hot spots on your model’s forehead. You might have clipped the highlights in there. This means that there won’t be much detail to pull out. In this image, I have only small warnings for the blacks on the left sleeve and for highlights in the zipper. Keep those warning toggles on to check you are not losing details when working on your dynamic range.
Working on the Dynamic Range
Because this is a low key image, I want to have the background really dark, if not pure black. Bu all the editing settings in the ACR Basic panel are global ones. This means that I will move the black slider on the left only until I start losing detail in my subject’s sweater. This will give a nice black color to the sweater, but still allow me to see the details of the fabric. I also move the white and highlight sliders until the image gets a bit brighter. Keep an eye out not to lose contrast and/or wash out the colors. Also, pay attention to the areas that are already bright, such as the spot on the forehead of my model. You don’t want to clip the highlights there. Now, with the dynamic range in place, I usually add a bit of contrast, to make things pop, particularly the eyes. Look at the skin tones to know when you are pushing the contrast too much. If the image gets soft and greyish, you have reduced your contrast too much. If skin tones get oversaturated, you have too much contrast. The contrast has brightened up the highlights and darkened the shadows. This is a low key setup though. Use the exposure slider to very gently darken the image again. Note that the exposure slider will brighten and darken the whole image. But it won’t affect the dynamic range.
Open Your Image in Photoshop
With this portrait, there is not much left to do except sharpening. You can apply sharpening in ACR. Here, it is applied by default, depending on the lens or camera profile embedded in the RAW file. Photoshop, however, has a plethora of different sharpening algorithms and methods. Maybe you want to change the background to pure black. That requires masking the subject and, once again, Photoshop has much more powerful and interesting ways to do so than ACR or Lightroom. If you are used to doing this basic editing in Lightroom, this is the point where you want to export your work into Photoshop. Without further ado, from ACR click on Open to open your image in Photoshop. When you do that, a file with the extension .xpm is created. This contains all the settings you have used in ACR. By opening the raw file, all those changes will be automatically applied to your image.
Final Retouches In Photoshop
The main differences you will face moving from ACR and Lightroom to Photoshop is that you have no local adjustments. Instead, you have levels and masks. Levels can be seen as layers in a stack: the uppermost one usually works on whatever is underneath. If you have your image on the bottom level, you can create a curve adjustment level on top of it to modify contrast and dynamic range. You can then create a saturation/hue level and this will work on the result you had from the curve level. When applying a filter to a layer, this is a definitive move. You cannot modify the filter after applying it, except if you applied it to a level that has been converted into a smart object. The effect of an adjustment layer is global, except when a mask is used to confine its effect to specific areas of the image. Finally, you can modify the effect of the levels by changing the blending mode and the opacity.
Cropping
While composition is not something to ignore when shooting, you may need, or want, to crop your image. I like to do that, before finishing up with sharpening and skin retouches. When cropping, pay attention not to crop at the joints, such as shoulders, elbows, knees, ankles and wrists. Doing that will give the impression of an amputation.
Sharpening
Sharpening should be the last thing to do in your editing workflow. When sharpening your portrait it is best to do that in steps. Start with sharpening the eyes, then the clothes and then the skin, for example. There are almost infinite different ways to sharpen a photo in Photoshop, so here is a simple way to do it.
Sharpening the Eyes
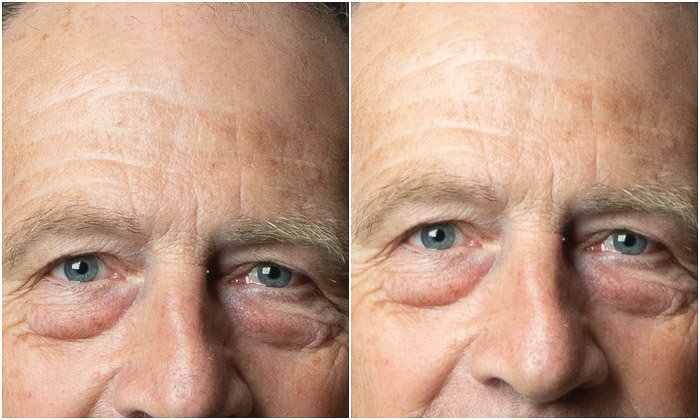
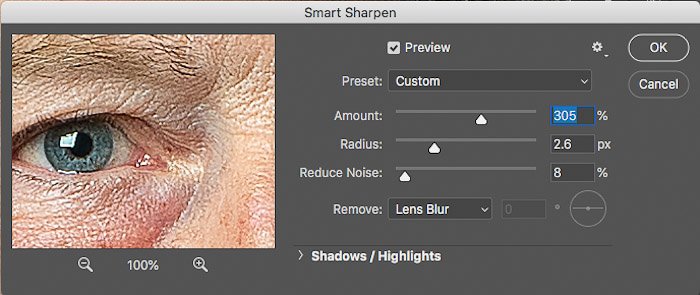
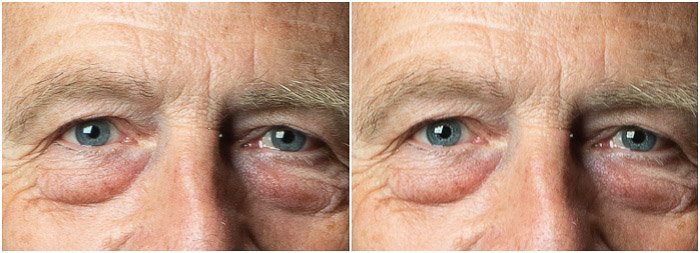
The eyes are one of the most important areas in a portrait. Duplicate your background layer and rename it as eyes. With a right click, convert it to a smart object. Now we can apply a filter and if we’re not happy with the result, we can modify it. This is the gist of a smart filter in Photoshop. Next, go to Filter -> Sharpen and choose Smart Sharpening. Crank up the amount to 500%, start increasing the radius until the large structures in the iris pop up. Then reduce the amount to a lower value, until the balance between noise and sharpening appears nice to you. Use a really small amount to reduce noise. Now the portrait will look very crisp. Using a mask, we can restrict the effect of the smart filter on the pupils and irises. To do that, click on the white square on the Smart filter level and go to Edit -> Image ->Invert. The square will turn black, meaning that the filter is not acting on the image. With a white, soft brush, paint over the pupil and iris of both eyes to let the filter work on those areas. Here is the before and after image. If you are not happy with the result, double click on the Smart Sharpen level of this smart object and tweak the values until you are satisfied.
Sharpening the Skin
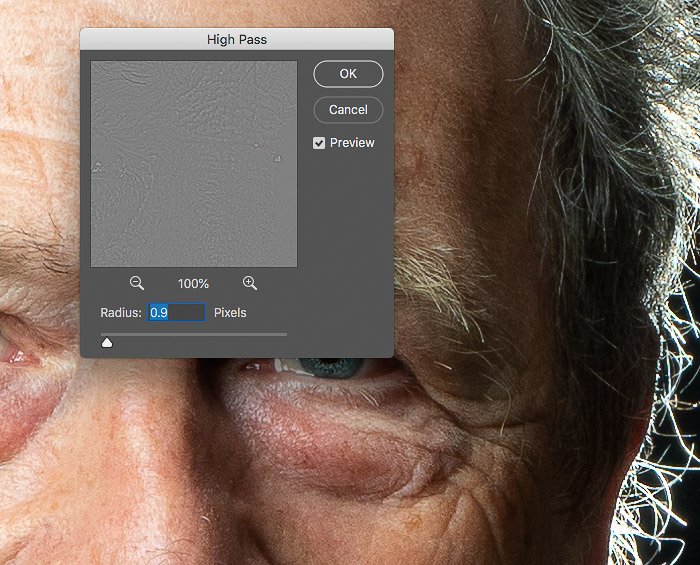
I found the skin a bit soft. To sharpen it without introducing much noise, I used the High Pass filter. I like to create a “stamp” level that works as a copy of the image with all previous retouches applied. Do that by pressing cmd+opt+shift+E on a Mac (ctrl+alt+shift+E on Windows). Now duplicate this level and convert it into a smart object, then go to Filter->Others->High Pass. A window will pop up with a Radius slider. The more you increase the radius, the more visible the image will appear in the grey area. The larger the radius, the stronger the effect. I like to stop when the image starts to creep into the grey area. In this case I used a radius of 0.9 px. Click apply and change the layer blending mode to “overlay” or “soft light” if you find the sharpening too strong. Turn the white square in the Smart Filter level to black and paint back the skin and hairs only. If you want, you can repeat this procedure and use a larger radius to sharpen the clothes as well. It is a subtle effect, but it does improve the image.
Image Cleanup
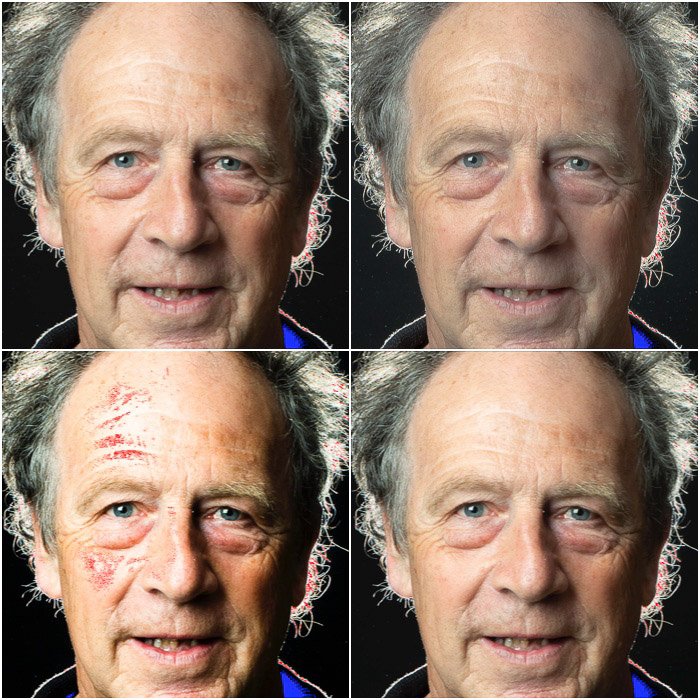
I like to use the clone stamp, or healing brush tools to clean up the image. For example, I’ll remove stray hairs, pimples and other skin imperfections. Frequency separation is a more advanced technique that is not so straightforward. Our article here explains it in more detail. You can also look at this article on Expert Photography on how to smooth the skin, but I feel this portrait does not need much skin smoothing. Finally, I may use a curve adjustment layer to finish up the exposure balance, if needed.
The Final Image
Here is my final image. The final image has much cooler color temperature, a more natural skin tone and a bit of extra punch in the eyes. This article should be enough for you to start to Photoshop portrait photos. I highly encourage you to look for more advanced techniques and different ways to apply sharpening or create a layer mask. If portraits are your main genre of photography, then you may have heard of PortraitPro 17, designed specifically for facial edits. Check out our Portrait Pro review or our article on the best Lightroom presets for portraits!


title: “How To Photoshop Portrait Photography Retouching Photos " ShowToc: true date: “2023-02-21” author: “Ida Gibson”
Photoshop Portrait: The Portrait
I chose this portrait because it is almost there straight from the camera. The key to enhancing this portrait is in the details. This is often the most difficult thing to get right when it comes to Photoshop.
Starting Out in ACR
When you open a RAW file with Photoshop, Adobe Camera RAW (ACR) opens in a new window. This is an automatic process you can’t avoid. Your Photoshop retouching will start with ACR when working on raw images.
The ACR Interface
The ACR interface has 3 main parts. It has a tool bar, an editing settings section and an image control section. This is where you can export, save your editing and open your image in Photoshop.
Before You Begin
Before starting the editing, it is best to look at your image and try to remember how you shot it. What was the lighting scheme and why did you chose it? What is the final use of the image and what aspects do you want to emphasise? When I took this portrait, I was using a classic two light setup. I was showing the role of separation light. To do this, I used rim light as the separation light. This works particularly well in this image, thanks to the subject’s hairdo. You may also note that this is a classic low key setup, so shadows and black should be rather deep. Finally, as in all portraits, the eyes need to pop but not look fake. This way that the viewer can engage with the model.
How to Achieve Natural Skin Tones
The basic editing I start out with is correcting or setting the dynamic range of the image. This includes the blacks and highlights. I also adjust the white balance to ensure my subject’s skin color is natural. Usually the skin is going to be a bit too orange in the image straight from the camera. This happens even if you used the flash setting for the white balance.
Setting the White Balance
I like to start with fixing the white balance. Straight from the camera, the image looks a bit too warm to me. I prefer to have less orange in the skin tone. To fix the white balance you can use the eyedropper tool. Sample areas that you know should be white-ish, grey or black. The image below shows you various edits. The first is the RAW image, followed by the one with Auto white balance applied. The rest are versions where I sampled various areas. These are marked with the red dot. I found that sampling the zipper (last image) gave me the most natural looking skin tone. So I kept that white balance and moved on with the editing.
Look For Clipped Areas
In ACR, above the histogram, there are two small icons, at each side of the histogram. Those toggle on/off the warnings for clipped highlights and blacks. Toggle them on and look if areas in your image are now colored in blue (black warning) or red (highlight warning). Sometimes you’ll have hot spots on your model’s forehead. You might have clipped the highlights in there. This means that there won’t be much detail to pull out. In this image, I have only small warnings for the blacks on the left sleeve and for highlights in the zipper. Keep those warning toggles on to check you are not losing details when working on your dynamic range.
Working on the Dynamic Range
Because this is a low key image, I want to have the background really dark, if not pure black. Bu all the editing settings in the ACR Basic panel are global ones. This means that I will move the black slider on the left only until I start losing detail in my subject’s sweater. This will give a nice black color to the sweater, but still allow me to see the details of the fabric. I also move the white and highlight sliders until the image gets a bit brighter. Keep an eye out not to lose contrast and/or wash out the colors. Also, pay attention to the areas that are already bright, such as the spot on the forehead of my model. You don’t want to clip the highlights there. Now, with the dynamic range in place, I usually add a bit of contrast, to make things pop, particularly the eyes. Look at the skin tones to know when you are pushing the contrast too much. If the image gets soft and greyish, you have reduced your contrast too much. If skin tones get oversaturated, you have too much contrast. The contrast has brightened up the highlights and darkened the shadows. This is a low key setup though. Use the exposure slider to very gently darken the image again. Note that the exposure slider will brighten and darken the whole image. But it won’t affect the dynamic range.
Open Your Image in Photoshop
With this portrait, there is not much left to do except sharpening. You can apply sharpening in ACR. Here, it is applied by default, depending on the lens or camera profile embedded in the RAW file. Photoshop, however, has a plethora of different sharpening algorithms and methods. Maybe you want to change the background to pure black. That requires masking the subject and, once again, Photoshop has much more powerful and interesting ways to do so than ACR or Lightroom. If you are used to doing this basic editing in Lightroom, this is the point where you want to export your work into Photoshop. Without further ado, from ACR click on Open to open your image in Photoshop. When you do that, a file with the extension .xpm is created. This contains all the settings you have used in ACR. By opening the raw file, all those changes will be automatically applied to your image.
Final Retouches In Photoshop
The main differences you will face moving from ACR and Lightroom to Photoshop is that you have no local adjustments. Instead, you have levels and masks. Levels can be seen as layers in a stack: the uppermost one usually works on whatever is underneath. If you have your image on the bottom level, you can create a curve adjustment level on top of it to modify contrast and dynamic range. You can then create a saturation/hue level and this will work on the result you had from the curve level. When applying a filter to a layer, this is a definitive move. You cannot modify the filter after applying it, except if you applied it to a level that has been converted into a smart object. The effect of an adjustment layer is global, except when a mask is used to confine its effect to specific areas of the image. Finally, you can modify the effect of the levels by changing the blending mode and the opacity.
Cropping
While composition is not something to ignore when shooting, you may need, or want, to crop your image. I like to do that, before finishing up with sharpening and skin retouches. When cropping, pay attention not to crop at the joints, such as shoulders, elbows, knees, ankles and wrists. Doing that will give the impression of an amputation.
Sharpening
Sharpening should be the last thing to do in your editing workflow. When sharpening your portrait it is best to do that in steps. Start with sharpening the eyes, then the clothes and then the skin, for example. There are almost infinite different ways to sharpen a photo in Photoshop, so here is a simple way to do it.
Sharpening the Eyes
The eyes are one of the most important areas in a portrait. Duplicate your background layer and rename it as eyes. With a right click, convert it to a smart object. Now we can apply a filter and if we’re not happy with the result, we can modify it. This is the gist of a smart filter in Photoshop. Next, go to Filter -> Sharpen and choose Smart Sharpening. Crank up the amount to 500%, start increasing the radius until the large structures in the iris pop up. Then reduce the amount to a lower value, until the balance between noise and sharpening appears nice to you. Use a really small amount to reduce noise. Now the portrait will look very crisp. Using a mask, we can restrict the effect of the smart filter on the pupils and irises. To do that, click on the white square on the Smart filter level and go to Edit -> Image ->Invert. The square will turn black, meaning that the filter is not acting on the image. With a white, soft brush, paint over the pupil and iris of both eyes to let the filter work on those areas. Here is the before and after image. If you are not happy with the result, double click on the Smart Sharpen level of this smart object and tweak the values until you are satisfied.
Sharpening the Skin
I found the skin a bit soft. To sharpen it without introducing much noise, I used the High Pass filter. I like to create a “stamp” level that works as a copy of the image with all previous retouches applied. Do that by pressing cmd+opt+shift+E on a Mac (ctrl+alt+shift+E on Windows). Now duplicate this level and convert it into a smart object, then go to Filter->Others->High Pass. A window will pop up with a Radius slider. The more you increase the radius, the more visible the image will appear in the grey area. The larger the radius, the stronger the effect. I like to stop when the image starts to creep into the grey area. In this case I used a radius of 0.9 px. Click apply and change the layer blending mode to “overlay” or “soft light” if you find the sharpening too strong. Turn the white square in the Smart Filter level to black and paint back the skin and hairs only. If you want, you can repeat this procedure and use a larger radius to sharpen the clothes as well. It is a subtle effect, but it does improve the image.
Image Cleanup
I like to use the clone stamp, or healing brush tools to clean up the image. For example, I’ll remove stray hairs, pimples and other skin imperfections. Frequency separation is a more advanced technique that is not so straightforward. Our article here explains it in more detail. You can also look at this article on Expert Photography on how to smooth the skin, but I feel this portrait does not need much skin smoothing. Finally, I may use a curve adjustment layer to finish up the exposure balance, if needed.
The Final Image
Here is my final image. The final image has much cooler color temperature, a more natural skin tone and a bit of extra punch in the eyes. This article should be enough for you to start to Photoshop portrait photos. I highly encourage you to look for more advanced techniques and different ways to apply sharpening or create a layer mask. If portraits are your main genre of photography, then you may have heard of PortraitPro 17, designed specifically for facial edits. Check out our Portrait Pro review or our article on the best Lightroom presets for portraits!
